Miss A. is crazy for crafting (I wonder where she got THAT from!? lol) She is constantly drawing, painting, gluing, and creating works of art for her dad and I. I have always needed a good place to display and keep her works of love. I finally came up with this cheep and easy idea. I am THRILLED with how it turned out!
Main Supplies-
Ball of twine
Clothes pins
Decoupage glue
Scrapbooking paper
Ribbon

Start the project by cutting a length of twine slightly longer than your desired finished length.

Next tie a loop at both ends of the twine

Next cut strips of your paper the size of your clothes pins

Decoupage the paper strips onto the clothes pins
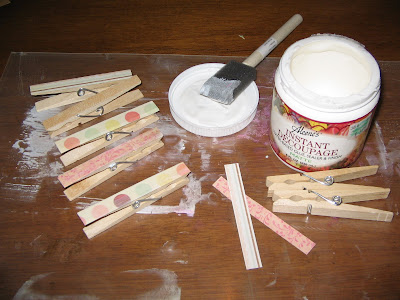
Once these are dry use a sharp craft knife to cut a small strip of the paper off and allow the wire on the clothes pin to show. I also sanded and inked the edges of the clothes pin to give them a finished distressed look.
 Next cut your ribbon in to several varied lengths. The lengths should be no shorter than about 2 inches and no longer than about 6 inches.
Now to assemble your art display
Tie the ribbon onto the twine about every two inches.
Clip the clothes pins onto the twine.

Now use some nails to hang your art display! Simply hook the loops of your twine over the nail and you have a beautiful and fun way to show off all your child's work!


ENJOY!

